
This blog post may contain affiliate links at no additional cost to you, however I may earn a small commission if you choose to purchase. I only recommend products I would use myself!
Half square triangles (also known as HSTs) are one of the most versatile quilt blocks you can make! They’re commonly used as smaller units within a quilt block, but you can also create an entire quilt made of just HSTs.
Not to mention, you can get VERY creative with different layouts when using HSTs!
They’re definitely a favourite of mine, which is apparent in how often I use them in my patterns. Here are the TBS patterns that use HSTs!
- Home Street
- Rockwood
- Boreal Forest
- Churchill
- Grand Beach
- Riding Mountain
- Birds Hill
- Steep Rock
- Cross Lake
- Spruce Woods
- Pine Falls
I also have a BRAND NEW PATTERN coming out this month (Star Lake) that uses lots of HSTs! To keep up to date on its release, make sure you sign up for my newsletter!
So, before we get into the nitty-gritty on HOW to sew HSTs, I wanted to give you a few tips first:
Clean and Prep Your Machine
The first thing you always want to do before sewing is to clean and prep your machine! I wrote a blog post all about how to make sure you and your machine are best friends before you start sewing.

Make a Test Block
If this is your first time making HSTs and you’re a little worried, don’t fret! Try making one using scrap fabric. This will also help make sure that your machine is threaded correctly (etc) before starting on your actual quilt pieces.

Practice Makes (almost!) Perfect
Just like with any other skill, practice will be your friend! I promise that over time, you will improve. You will also learn your machine and become very comfortable with its unique quirks.
And you’ll also learn what tools, rulers, methods, techniques etc, you like along the way…all of these things take time!
All Quilts Are Deserving Of Love
One more thing. Please remember that even a quilt with wonky seams and missing points can still be a well-LOVED, well-USED quilt. My house is proof of that!

HOW TO SEW HALF SQUARE TRIANGLES (HSTs)
I’m going to walk you through three different HST techniques, two of which minimize fabric waste!
You may have also heard of a four at a time method, which I didn’t include. It’s my least favourite technique because it results in a lot of bias edges that can be very finicky to work with due to the fabric having a bit of stretch to it!
Tip: Remember to always pay close attention to your pattern to make sure you are using the right technique at the right time!
TECHNIQUE 1: ONE AT A TIME HSTs
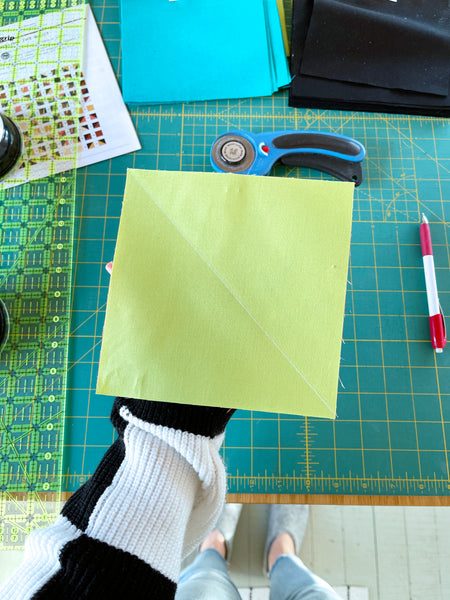
First, pair your two squares right sides together (RST).
On the wrong side of one of your squares, mark a diagonal SEWING line.
You can use an erasable pen like this (Canadians, click here) or a Hera Marker (Canadians, click here).
If you’re using a Hera Marker, make sure you are not pushing so hard that you stretch the fabric!
If you don’t have any sort of marking tool, you can also use your iron to crease the fabric! This way, there is also no fear of ink stains.

You can choose to pin the two squares if you desire, or just sew as is! I personally don’t pin at this point - but it’s totally up to you!.

Now you will need to sew directly ON the marked line.

Cut a ¼” seam allowance on one side of the sewn line.

If your quilt calls for multiple HSTs, then you may want to work in batches. Personally, I find that this helps keep me motivated and the process moves a little faster!
For example, I will pair up all of my fabric combinations first. Then, I will mark all the HSTs at one time. Then I will sew them all together…also known as chain piecing! Stay tuned for a blog on chain piecing coming soon.
TECHNIQUE 2: TWO AT A TIME HSTs
First, pair your two squares right sides together (RST).


On the wrong side of one of your squares, mark a diagonal CUTTING line.
I like to mark them all at one time so they’re ready to go.
You can choose to pin the two squares together, or just sew as is! I personally don’t pin at this point - but it’s totally up to you!
Now you will need to sew a ¼” seam along BOTH sides of the marked line.


To do that, you’ll need to make a total of FOUR cuts in the following order:
Align your ruler with the centre where your drawn lines intersect and with one straight edge of the fabric.
Note: If your ruler has a 45-degree line, it can be helpful to line this up with the diagonal marked line as well.
Cut vertically down the centre. It’s best to leave the pieces where they are - don’t try to rotate the fabric!

Now, make a second cut perpendicular to the first.
Lastly, cut along both marked diagonal lines between your stitching lines. Try not to shift the fabric! A rotating cut mat can be very helpful - like this one! (Canadians, click here)
Separate the pieces into eight individual HSTs!

TRIMMING HSTs
Trimming is a necessary step for the Two At A Time and Eight At A Time methods. 99% of the time, I use a regular square ruler to trim everything. Nothing fancy. And for me, it works GREAT!
However, during the Home Street QAL, I ordered a “fancy” HST ruler that I had seen floating around the social sphere and wanted to give it a try.
I ordered the Slotted Trimmers from Piece Fabric Co. - who had every size in stock, by the way!

Below, I’ll walk you through both the square ruler and the slotted trimmer, step by step - and then it’s up to you to choose your favourite!
TRIMMING HSTs WITH A SQUARE RULER
If you’re planning on using a “regular” ruler (like a square ruler), you will need to press your HSTs open first.
The two most important things to keep in mind when trimming half square triangles are:
- You want to trim on ALL FOUR SIDES (not just two).
- And you want to make sure you are lining up the 45-degree seam with the 45-degree line on your ruler!
Place your ruler on your HST. Notice how there is excess fabric on all four sides and the centre is lined up.
Trim off the excess on the side and top. Apply downward pressure to your ruler so it doesn’t move!


Now, rotate your HST (or your cutting mat, if you have a fancy rotating mat) to trim the other two sides.

Double-check your measurements and the 45-degree angle. Then trim the rest of the HST.

And repeat!
TRIMMING HSTs WITH A SLOTTED TRIMMER
The benefit of slotted trimmers is that you can trim all sides of your HST (and the dog ears) at the same time - and all before pressing. It’s definitely a time saver!
But one downside is that the ruler only includes a small range of sizes - so you may need to buy more than one.
Each ruler will cover a range of sizes, but make sure you have the right size for the quilt you will be making. Something to watch for!
Place the ruler on top of your still folded HST.

Line up the stitched seam with the dashed line on the ruler (at the correct measurement).
Note: The grey area is your seam allowance.
Keep in mind, it’s more important to line up the stitched line than it is the edge of your seam allowance. This ensures the HST is the correct size!
Trim along the two sides of the ruler - again, use downward pressure to hold the ruler in place.
Lastly, trim off the dog ears by using the little slots on the ruler.


Don’t forget to press your HSTs open after trimming!
BLOC LOC RULER
Another popular option is the Bloc Loc ruler. Personally, they aren't my favourite because you have to press your HSTs to the side.
But, a lot of people love them! In fact, there has been a bit of discussion around them in our Facebook group. If you haven't already, join us here!
I hope you’ve found this helpful! Happy Quilting!
Have questions about HSTs or about anything in the shop? Please reach out to hello@theblanketstatement.ca and we’ll help you out!